Welcome to our detailed tutorial for beginners. We’re here to teach you about peyote bezels and bead caps. These skills are key for anyone starting in beading and jewellery design. Learning peyote stitch is rewarding and boosts your confidence.
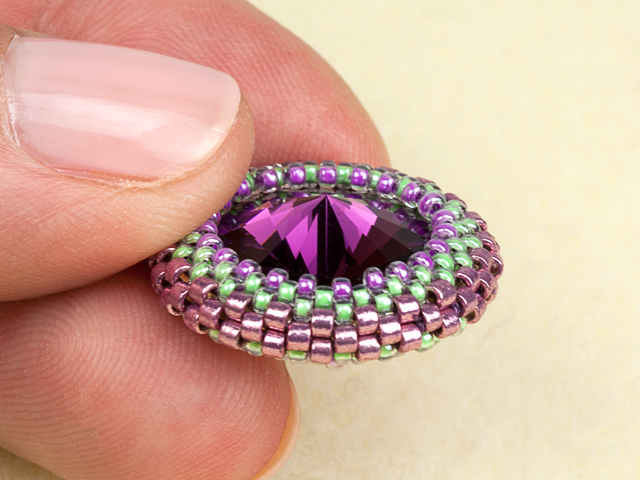
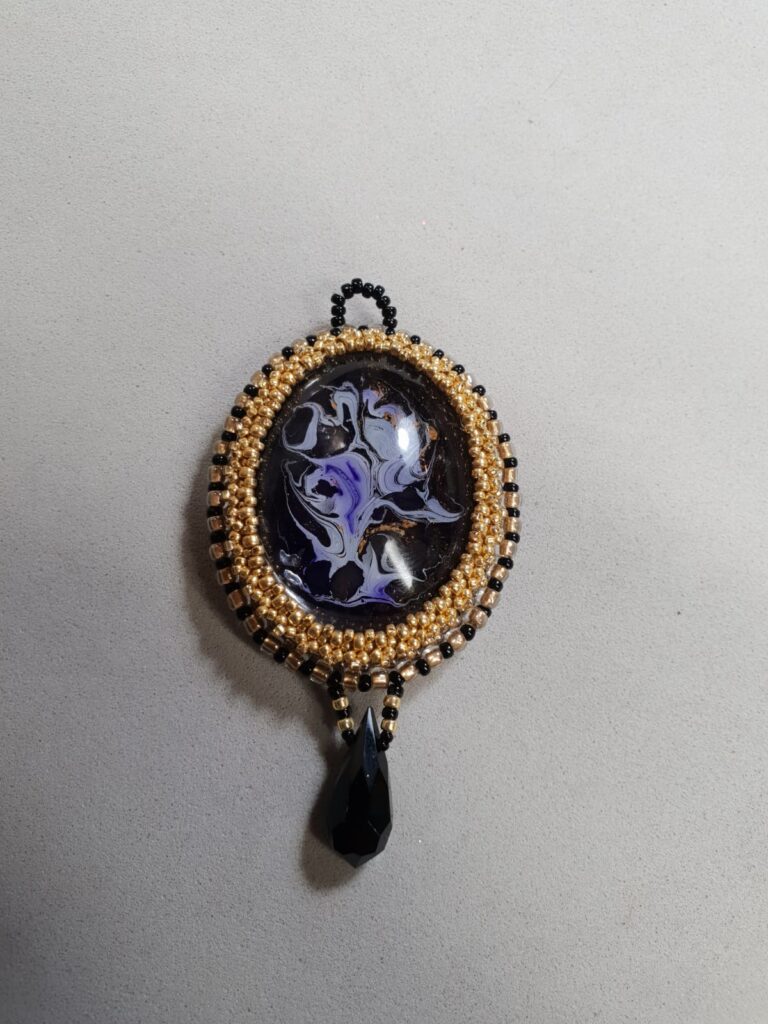
Peyote bezels are great for securing cabochons, crystals, or beads. They make any jewellery piece stand out. Bead caps, meanwhile, add a touch of elegance to bracelets, necklaces, and earrings.
In this tutorial, we’ll guide you every step of the way. It’s designed to be fun and rewarding. With patience and practice, you’ll soon create beautiful jewellery to be proud of.
Key Takeaways
- Introduction to peyote bezels and bead caps for beginners
- Materials and tools needed for the craft
- Basics of the peyote stitch technique
- Step-by-step guide for creating peyote bezels
- Tips on incorporating unique bead shapes
Introduction to Peyote Bezels and Bead Caps
The craft of jewellery-making has grown thanks to techniques like the peyote stitch. These are key for making detailed bezels and bead caps. They add beauty and strength, helping to finish off beading projects.
The peyote stitch comes from ancient cultures and is loved by today’s artists. It’s known for its flexibility and making a tight, even weave. Learning about peyote bezels and bead caps opens up a world of jewellery-making for all skill levels.
This guide will teach you the basics. You’ll learn the important stuff and get ready to start your beading adventure. Soon, you’ll be making beautiful bezels and bead caps with ease.
Materials Needed for Peyote Bezels and Bead Caps
Starting your peyote bezels and bead caps journey means getting to know the key materials. We’ll explore the different beads, seed beads, tools, and accessories you’ll need for this craft.
Beads and Seed Beads
Choosing the right beads and seed beads is crucial for peyote stitch projects. For bezels and caps, you have a wide range of shapes, sizes, and colours to pick from. You can use round, cylindrical, and even special shapes like Delica and Rocailles to spark your creativity.
- Round Beads: Great for smooth curves in your bezels.
- Cylindrical Beads: Best for a sleek, uniform look.
- Colour Variety: You can choose from bright colours to soft tones.
Tools and Accessories

Working on peyote stitching is more fun with the right tools and accessories. Here’s what you’ll need:
- Beading Needles: Long, thin needles for easy seed bead threading.
- Thread: Strong, flexible thread like FireLine or Nymo keeps your work in place.
- Scissors: Sharp scissors for clean thread cuts.
- Beading Mat: A soft mat to keep beads from rolling off while you work.
With the right beads, seed beads, tools, and accessories, you’re ready to make beautiful peyote stitch bezels and bead caps.
Getting Started with Peyote Stitch
Starting your peyote stitch beadwork journey is exciting and rewarding. This guide will help you learn the even-count and odd-count peyote stitch. These stitches are key for making beautiful bracelets and necklaces.
Even-Count Peyote Stitch
The even-count peyote stitch is great for beginners. Its symmetrical pattern makes it easy to follow. This creates uniform and beautiful beadwork.
- String your beads onto the thread, ensuring you have an even number.
- Pick up a bead, skip one on your row, and pass through the next.
- Continue this pattern until you reach the end of the row.
- Turn your work and repeat, always picking up a new bead and passing through the ‘up’ beads of the previous row.
This method is perfect for creating bracelets and necklaces. It gives a consistent and seamless look.
Odd-Count Peyote Stitch
The odd-count peyote stitch is a bit more complex. But it’s great for intricate designs. Here’s how to start:
- Begin by threading an odd number of beads.
- Just like with even-count, pick up a bead, skip one on your row, and pass through the next.
- Continue this pattern, but with every row change, you’ll encounter an additional step to anchor the turning bead.
- Use a figure-eight turn or other methods to stabilise the bead at the row ends.
This stitch is perfect for unique designs. It’s great for adding patterns and details to bracelets and necklaces.
Comparing these stitches helps you choose the right one for your project:
| Feature | Even-Count Peyote Stitch | Odd-Count Peyote Stitch |
|---|---|---|
| Symmetry | Symmetrical | Asymmetrical |
| Complexity | Beginner-friendly | More complex |
| Pattern Flexibility | Consistent | Unique designs |
Learning these basic techniques is the first step to mastering beadwork. Whether you prefer the even-count for simplicity or the odd-count for versatility, both will open up new creative possibilities.
Step-by-Step Guide to Creating Peyote Bezels
Making beautiful peyote bezels is a detailed but rewarding task. This guide will show you how to start with the first row of peyote stitch. It will also cover how to add and finish threads.
First Row of Peyote Stitch
The first row is key to a clear peyote bezel. Start by picking your main beads. Thread your needle with enough length for easy beadwork. Choose an even number of beads for the size you want.
Keep the tension even and firm as you go. This will help form the bezel’s base structure.
Adding and Finishing Threads
Keeping your peyote bezels strong and looking good is important. When adding new threads, mix the old and new through several rows. This makes your bezel strong and keeps it looking smooth.
For finishing threads, weave the thread back through many rows before cutting it. This stops any fraying and keeps your beadwork tight.
| Step | Description |
|---|---|
| 1 | Choose your beads and thread your needle. |
| 2 | Pick up an even number of beads, forming a foundational row. |
| 3 | Secure the first row by passing the needle back through the initial beads. |
| 4 | Add new threads by weaving through multiple rows for strength. |
| 5 | Finish threads by weaving and trimming, ensuring a secure, tidy end. |
Creating Bead Caps Using Peyote Stitch
Making bead caps with peyote stitch is a fun way to add a stylish finish to beaded ropes or objects. This tutorial will show you how to make these decorative accents. You’ll learn how to fit them perfectly for different bead shapes and uses.
First, measure the diameter of the bead you want to cap. This will tell you how many beads you need for your circle. You can adjust as you go to make sure it fits just right. Here’s how to start:
- Thread your needle and pick up an even number of beads.
- Create a circle by passing the needle through the first bead and pulling tight.
- Start your first row of peyote stitch by adding a bead and skipping one bead from the previous circle.
- Keep going, making sure the beads fit snugly together to form the base of your bead cap.
As you work, check your bead cap on the bead to see if it fits. This lets you make any needed changes before you finish. It’s easy to change the size and design of your bead cap with these steps:
- Increase: Add more beads to your circle for bigger beads.
- Decrease: Remove beads from your circle for smaller beads.
- Pattern Variation: Try different bead sizes and colours for unique designs.
Here’s a comparison table for bead sizes and the number of beads you should start with for your bead caps:
| Bead Size (mm) | Initial Bead Count |
|---|---|
| 4 mm | 8 beads |
| 6 mm | 12 beads |
| 8 mm | 16 beads |
| 10 mm | 20 beads |
These tips will help you make bead caps that look good and work well. With practice, you can fine-tune your designs. This will add a special touch to your beadwork projects.
Incorporating Unique Bead Shapes
Exploring unique bead shapes like rizo beads and mixing different elements such as pearls and bicones can add remarkable dimensions to your peyote stitch creations. These distinct shapes and combinations enhance your designs, making them stand out with innovative flair.
Using Rizo Beads
Rizo beads, with their elongated rice-like shape, bring a unique textural element to peyote stitch projects. They add an elegant elongation and visual interest that traditional seed beads might lack. Their versatile form factor allows them to be seamlessly integrated, ensuring that your creations have a singular artistic touch.
Mixing Pearls and Bicones
Combining pearls and bicones with traditional seed beads offers an enriching textural and visual appeal to any peyote stitch project. Pearls add a touch of classic elegance, while bicones lend a sparkling effect. When used together, they create a balanced, sophisticated look that elevates the overall design. Incorporating pearls and bicones together within your peyote stitch pieces showcases a beautiful interplay of shapes and finishes.
| Bead Shape | Characteristics | Best Used For |
|---|---|---|
| Rizo Beads | Elongated, rice-like | Peyote Bezels, Bead Caps |
| Pearls | Classic, Round | Adding Elegance |
| Bicones | Faceted, Sparkling | Enhancing Sparkle |
Adding Decorative Edges: Picot Edge and More
Decorative edges can make your bead weaving projects stand out. They add a special touch that boosts the look. Picot edge is a favourite for its delicate, lace-like quality. It makes a beautiful frame for your beadwork.
Creating a Picot Edge
The picot edge technique adds beads at regular intervals along the border. This makes the edge stronger and adds a decorative flair:
- Start by exiting from the edge bead of your peyote work.
- String three seed beads and go back through the next edge bead in the direction you’re working.
- Repeat this process all the way around the border.
- Tug gently to ensure the picot edge sits neatly.
Other Decorative Edges
There are many other decorative edges you can use in bead weaving:
- Scalloped Edge: Make a wavy design by using different bead sizes along your edge.
- Beaded Fringe: Add length and movement with short strands of beads that dangle from the edge.
- Ndebele Rope: This edge has interconnected loops, giving a bold, eye-catching border.
| Edge Type | Materials Needed | Effect |
|---|---|---|
| Picot Edge | Seed Beads | Delicate, Lace-like |
| Scalloped Edge | Various Bead Sizes | Wavy, Textured |
| Beaded Fringe | Bead Strands | Dynamic, Dangling |
| Ndebele Rope | Seed Beads | Bold, Intricate |
Trying out these decorative edges can add a new level to your projects. It can turn simple designs into stunning works of art.
Making Necklaces and Bracelets with Peyote Stitch
Making necklaces and bracelets with peyote stitch is a journey into intricate designs. It’s a chance for jewellery lovers to create stunning pieces. Here’s how to get started.
“The beauty of jewellery-making lies in its blend of creativity and technique, especially evident in peyote stitch patterns.”
First, you need a design plan. Choose the style, pattern, and colours for your necklaces and bracelets. A good plan makes your final piece look great.
Next, connect the parts like clasps, chains, and focal beads. These add both function and beauty. Use top-quality materials for lasting beauty.
| Component | Purpose | Best Used For |
|---|---|---|
| Clasp | Secures the jewellery | Both Necklaces and Bracelets |
| Chain | Adds length and flexibility | Necklaces |
| Focal Bead | Serves as a central decorative element | Both Necklaces and Bracelets |
Finally, adjust the pattern for the right length and style. Make sure necklaces fit well around the neck and bracelets fit snugly on the wrist.
With these tips, you can turn simple peyote stitch into amazing necklaces and bracelets. Enjoy making jewellery!
Advanced Techniques: Tubular Peyote and Bead Weaving
If you love beads, learning tubular peyote and right angle weave can take your skills to the next level. These techniques help you make detailed and strong beadwork. Your jewellery will surely impress everyone.
Tubular Peyote Stitch
The tubular peyote stitch turns flat peyote into a 3D shape, perfect for bead ropes and textured pieces. It’s worked in the round, creating smooth, spiral patterns. Mixing different bead sizes and finishes makes your work look even more interesting.
Right Angle Weave
The right angle weave is loved for its strong structure and detailed patterns. It lets you build beads at right angles, making a sturdy grid. It’s great for making intricate items like bracelets and anklets. You can use one or more threads to add more complexity to your designs.
Freeform Patterns and Creative Variations
Exploring freeform patterns in peyote stitch brings new life to traditional beadwork. It lets you create unique and personal jewellery. The beauty of these patterns is their unpredictability, leading to endless creative variations.
Mixing different colours and bead types, like delicas, seeds, and crystals, adds depth and texture. Start with a peyote stitch base and then add various bead sizes and shapes.
Here are key tips for mastering freeform patterns:
- Improvisation: Feel free to change your pattern as you go. Let your creativity flow by sewing beads without overthinking.
- Colour Play: Try colour gradients for smooth transitions between pattern sections.
- Variety of Beads: Use different bead sizes and shapes for a dynamic design.
For inspiration, compare traditional and freeform peyote designs:
| Traditional Peyote | Freeform Peyote |
|---|---|
| Structured and Symmetrical | Organic and Asymmetrical |
| Defined Pattern | Unpredictable Design |
| Uniform Beads | Mixed Bead Sizes and Shapes |
By using these techniques, you’ll master freeform patterns and creative variations in peyote stitch. Your creations will show off your unique artistic vision.
Conclusion
This detailed tutorial has given you the key skills to master peyote bezels and bead caps. You now know what materials you need and how to do basic and advanced stitches. Your journey through beadwork has been both thorough and helpful.
You’ve seen different styles, like even-count and odd-count peyote stitches. You’ve also learned how to use unique bead shapes and add decorative edges. This lets you make detailed and lovely beaded items.
Keep practising and making your designs your own. The peyote stitch world is huge and full of creative chances. Feel free to try new things and make something special. The skills you’ve learned can help you make amazing necklaces, bracelets, and more.
We’d love to see what you’ve made. Share your peyote bezels and bead caps in the comments or on social media. Your work not only shows off your talent but also inspires others. Your help is very important to both new and experienced bead artists. So, let’s celebrate the beautiful world of peyote stitch together!
FAQ
What are peyote bezels and bead caps?
Peyote bezels and bead caps are detailed beadwork pieces made with the peyote stitch. Bezels cover or outline focal points like cabochons or stones. Bead caps decorate the ends of beaded ropes or strands.
Is the peyote stitch suitable for beginners?
Yes, it is! The peyote stitch is great for beginners. Our guide will walk you through each step, from the basics to making bezels and bead caps.
What materials do I need to start with peyote bezels and bead caps?
You’ll need beads, seed beads, beading needles, thread, scissors, and a beading mat. These tools help you make beautiful, lasting beadwork.
How do I get started with the peyote stitch?
Start with the even-count peyote stitch for a symmetrical pattern. Once you’re confident, try the odd-count peyote stitch for more creative freedom.
Can I incorporate unique bead shapes into my designs?
Yes, you can. Using beads like rizo beads or mixing pearls and bicones adds texture and beauty. Our guide shows you how to use these in your designs.
What is a picot edge, and how do I create it?
A picot edge gives your beadwork a delicate, lacy finish. Our tutorial will teach you how to make one, along with other decorative edges.
Can I use peyote stitch to make necklaces and bracelets?
Yes, the peyote stitch is perfect for necklaces and bracelets. Our guide will help you design, connect, and adjust your pieces.
What are some advanced techniques I can try?
After mastering the basics, try advanced techniques like the tubular peyote stitch and right angle weave. These add complexity and structure to your work.
How do I create freeform patterns with peyote stitch?
Freeform peyote patterns let you be creative and try new things. Mix colours, use different beads, and improvise for unique pieces. Our guide offers tips and ideas for freeform designs.
How do I share my beaded creations?
Share your beaded work in comments or on social media. It’s a great way to show off your creations and inspire others.