The Herringbone Stitch, also known as Ndebele Stitch, is loved by many bead enthusiasts. This guide focuses on the tubular twisted herringbone stitch. It’s a special version that makes a stunning spiral pattern.
It’s a top choice for those who love making jewellery and intricate beadwork. By following this tutorial, you’ll learn how to make your own twisted tubular herringbone stitch pieces. You’ll use different colourful patterns and beads.
Key Takeaways
- Understanding the basics of the Herringbone Stitch.
- Learning the distinct tubular twisted herringbone approach.
- Exploring various bead patterns and color combinations.
- Step-by-step guidance on achieving a spiral effect.
- Tips on creating jewellery pieces like bracelets and necklaces.
Introduction to Twisted Tubular Herringbone Stitch
The tubular twisted herringbone stitch is a special beading technique known for its beautiful spiral patterns. It’s perfect for making stunning jewellery. This technique turns simple herringbone stitch into a detailed masterpiece.
To begin learning this beadwork, knowing the basics of herringbone stitch is key. Adding a twist creates a stunning helical effect. This adds depth and character to your work.
This technique not only makes your work look better but also lets you try new bead patterns. Whether you’re following a tutorial or making your own designs, it’s a great way to be creative in jewellery making.
The stitch has a rich history in beadwork. It’s loved for making dynamic and eye-catching pieces. Advanced beaders often use this tutorial to add something special to their jewellery designs.
If you’re starting a new project or want to improve your skills, learning the tubular twisted herringbone stitch is a great start. It helps you make your beadwork creations even better.
Materials Required for Your Project
Before starting your twisted tubular herringbone stitch, make sure you have all the right materials. The quality and choice of your supplies are key to a successful project. Here’s a detailed materials list to help you craft without a hitch.
Beads
Picking the right beads is essential for your stitch’s look and feel. A seed bead is best for its uniform shape and wide colour range. Choose a consistent bead size, like size 11/0 or 8/0, to affect your stitch’s final look.
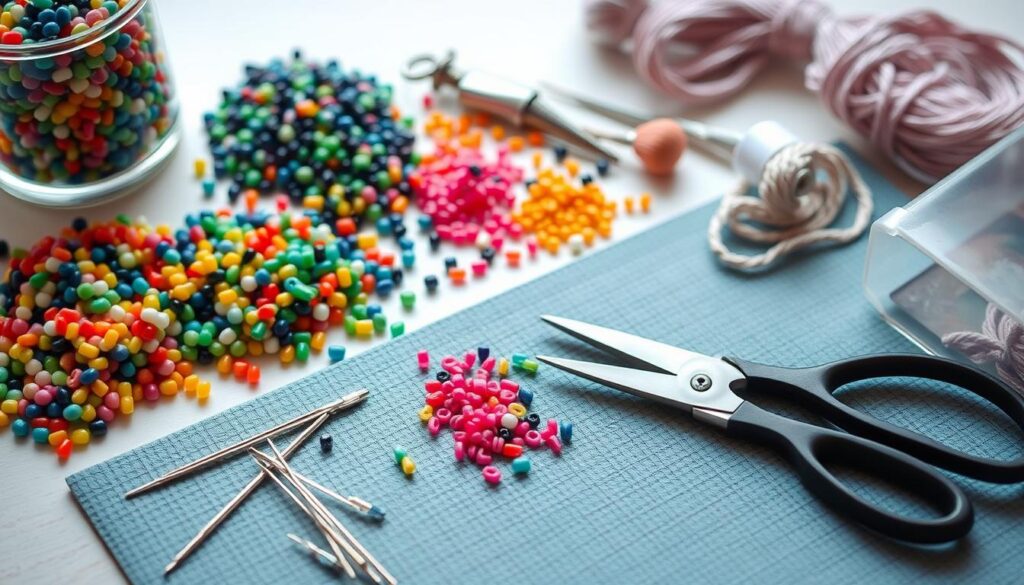
Thread
The thread you choose is also crucial. Go for a thread type that’s strong and made for beading. Nymo, Fireline, and WildFire are good choices for their durability and flexibility. Make sure the thread colour matches or complements your seed beads.
Needle
Having the right needle is important for smooth beading. A beading needle of size 10 or 12 is best, as it’s thin enough to thread through beads without harm. Don’t forget to add needles to your materials list as part of your project supplies.
Here’s a quick summary of the basic supplies needed:
| Materials | Details |
|---|---|
| Seed Beads | Size 11/0 or 8/0 |
| Thread | Nymo, Fireline, WildFire |
| Beading Needle | Size 10 or 12 |
Step-by-Step Instructions for Twisted Tubular Herringbone Stitch
Learning the twisted tubular herringbone stitch takes time and focus. Follow these steps to make beautiful jewellery easily.
First Row Setup
The first row is key for your stitch’s foundation. Start by threading your needle with beading thread. Pick up four beads and slide them to the thread’s end, leaving a bit for later. Then, stitch through all four beads again to make a small loop. This loop is your first row’s start. Make sure it’s tight for a solid base.
Adding Beads
To add beads, pick up two beads and pass through the next bead in the first row. Keep doing this around the loop, making sure each bead is close to the next. This makes the tube shape. Keeping this pattern helps the twist appear later.
Creating the Twist
To make the twist, follow a special needle path and bead rotation. As you add beads, twist the tube gently. Keep the twist even by watching your bead placement and following the same path. This is what makes the stitch look elegant and twisted.
By following these steps, you can add stunning twists to your beadwork. This makes your jewellery designs stand out. Remember, the more you practice, the better you’ll get at this beautiful technique.
How to Achieve the Spiral Effect
Learning the tubular twisted herringbone stitch starts with managing tension and bead orientation. Proper bead alignment is key for a stunning helical pattern. This stitch is loved by both new and seasoned bead artists for its texture and visual appeal.
- Start by keeping your tension even. This ensures the beads fit snugly and create the spiral effect you want.
- Focus on bead alignment. Place each bead carefully to get an even twist.
- Try different beads for unique texture and visual effects.
The table below outlines important factors for the spiral effect:
| Factor | Description |
|---|---|
| Tension | Keep your tension tight but even to avoid distorting the beadwork. |
| Bead Alignment | Align beads carefully to maintain a uniform spiral. |
| Bead Type | Experiment with different bead types for varied texture and visual effects. |
By using these techniques, you can master the tubular twisted herringbone stitch. The mix of texture and alignment makes your work truly special.
Choosing the Right Colours & Patterns
Choosing the right colours and patterns is key to making your twisted tubular herringbone stitch stand out. This guide will help you pick the best beads and try out different patterns.
Using Two Different Colours
Using two colours can really make the twist in the stitch pop. You can go for bold contrasts or softer, matching hues. Try vibrant colours for a bold look or pastels for something more calm.
Using One Colour
A monochromatic scheme lets the stitch’s texture shine. Using one colour keeps the focus on the pattern. It’s a simple yet elegant choice that never goes out of style.
Experimenting with Patterns
Mixing contrasting patterns can lead to amazing designs. Try different bead sizes or textures in your colours. It’s all about finding the right mix of monochromatic scheme and bold designs. Don’t be afraid to try new things with your bead colours.
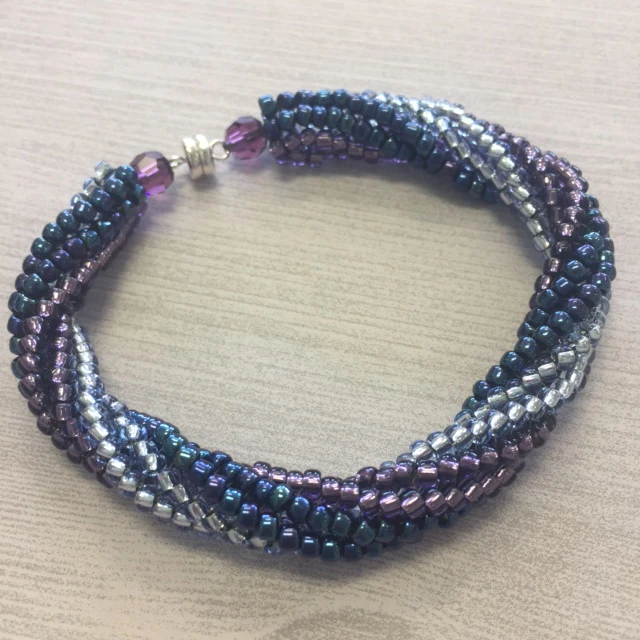
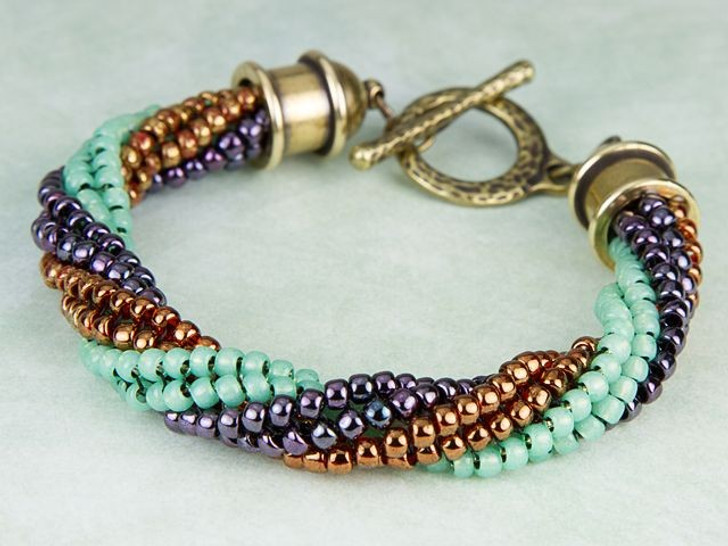
Creating a Bracelet with the Twisted Tubular Herringbone Stitch
The twisted tubular herringbone stitch is elegant and versatile. It’s perfect for many jewellery projects. To make a beautiful bracelet, choose the right beads and materials. Also, pick a good clasp for a professional finish.
Recommended Beads and Materials
The beads you pick will make a big difference in your bracelet’s look. Delica beads are great because they’re the same shape. They help make tight stitches that look good.
Also, use FireLine thread for its strength. A good beading needle is important for going through beads easily. The right materials make your project easier and last longer.
Adding a Clasp
A clasp finishes your bracelet and adds a touch of class. You can choose from lobster clasps, magnetic clasps, or toggle clasps. Each has its own charm and use. For example, magnetic clasps are easy to use, while toggle clasps are fancy.
When you add the clasp, make sure the stitches around it are strong. This way, your bracelet will last longer. Whether you like simple or fancy designs, the right clasp will make your bracelet better.
By focusing on your bead choice, thread, needle, and clasp, you can make a unique bracelet. It will show off the twisted tubular herringbone stitch’s beauty.
Tips for Making a Necklace
Making a necklace with the twisted tubular herringbone stitch lets you get creative. It’s important to get the desired length right for a good fit. Trying out different design ideas can make your necklace special.
Adjusting the Length
Getting the necklace length just right is key. Start by measuring the neck of the person it’s for. This makes sure it fits well and is comfy.
Use a flexible measuring tape and remember to add for the clasp. This will help you figure out the total length needed.
- Measure the neck circumference accurately.
- Add a few centimetres to account for the clasp.
- Cut your thread according to the determined measurement, adding a little extra for ease of beading techniques.
Design Variations
Try out different design ideas to make your necklace unique. Mixing up beading techniques and materials can lead to one-of-a-kind pieces. Here are some tips to spark your creativity:
- Alternate between different bead sizes and colours.
- Incorporate charms or pendants for added interest.
- Experiment with patterns and symmetry for a dynamic look.
By paying attention to these details, you can make a necklace that’s not only perfect but also shows off your creativity. It’s all about the design and the personal touches you add.
Common Mistakes and How to Correct Them
Starting the twisted tubular herringbone stitch can lead to many common issues. But don’t worry, knowing these problems and how to fix them can help a lot.
One big mistake is having the wrong bead tension. If it’s too tight, your work might curve the wrong way. If it’s too loose, the beads won’t line up right. To fix this, keep your tension even by checking your work often.
Another common error is counting beads wrong. It’s important to count them right to keep your pattern neat. If you mess up, take it apart and start again from where you went wrong. This way, you won’t make the mistake bigger.
Thread knots are also a problem. To avoid them, use shorter threads and sew gently. If you do get a knot, untangle it slowly with a needle or beading awl.
Here’s a quick guide to common mistakes and how to fix them:
| Common Mistake | Correction |
|---|---|
| Incorrect tension | Adjust to consistent, moderate tension; frequently check progress. |
| Miscounted beads | Carefully undo and recount, ensuring accurate alignment. |
| Thread knots | Use shorter thread lengths; untangle knots gently with tools. |
To fix mistakes well, use these tips and tricks. Your beadwork will look great and professional. Use these troubleshooting tips to avoid getting stuck and finish your projects with confidence.
Basic Techniques to Master for Twisted Tubular Herringbone Stitch
To master the twisted tubular herringbone stitch, knowing the foundation techniques is key. This beading pattern is known for its elegant twists and detailed design. It requires several essential skills that you can learn with patience and practice.
For beginners, there’s a unique learning curve in this beadwork journey. Getting to know the basic steps and improving them is crucial for beadwork proficiency. Here are some fundamental techniques to focus on:
- Mastering the Initial Setup: Start by understanding the importance of a strong foundation. A well-structured base at the beginning can greatly affect the final design.
- Thread Tension Control: Keeping the thread tension consistent is vital. If it’s too tight, beads might break. If it’s too loose, the pattern won’t stay in shape.
- Incorporating Beads Smoothly: Practice adding beads smoothly to keep the spiral flowing naturally. This helps in creating a seamless twist in your beadwork.
- Creating and Maintaining the Twist: The twist is the stitch’s signature feature. Regularly check and adjust your work to keep the spiral’s integrity.
Using these foundation techniques helps master the twisted tubular herringbone stitch and boosts your beadwork proficiency. Patience and regular practice are your best friends as you tackle the learning curve. These essential skills will become second nature over time.
| Technique | Key Focus | Tip for Success |
|---|---|---|
| Initial Setup | Strong Foundation | Ensure a steady and symmetrical base |
| Thread Tension | Consistency | Avoid over-tightening to prevent bead breakage |
| Adding Beads | Smooth Transitions | Maintain a natural flow to enhance the twist |
| Creating Twist | Spiral Integrity | Regularly adjust to keep the twist intact |
Free Beading Tutorial Video
If you love watching tutorials, our free beading video is for you. It’s a great match for our detailed written guides. The video shows each step clearly, making it easy to follow along.
Watching the video lets you see every detail and technique. This is super helpful for mastering the twisted tubular herringbone stitch.
Video Tutorial Link
We know everyone learns differently. That’s why we’ve added a video tutorial link. This free tutorial covers everything you need to know about the twisted tubular herringbone stitch.
From setting up the first row to creating the twist and spiral effect, it’s all explained. This visual guide can help clear up any doubts, boosting your confidence in beading.
Additional Resources
Looking for more help and ideas? We’ve got a list of extra resources for you. These include detailed guides, different bead patterns, and beading communities.
Using these resources can make your learning journey better. They also open up a world of new beading possibilities.
FAQ
What is the Twisted Tubular Herringbone Stitch?
The Twisted Tubular Herringbone Stitch, also known as Ndebele Stitch, is a complex beading technique. It creates a stunning spiral pattern. This pattern is great for making jewellery like bracelets and necklaces.
What materials do I need to start a Twisted Tubular Herringbone Stitch project?
You’ll need seed beads, beading thread, and a fine beading needle (size 10 or 12). You might also need a clasp for bracelets or necklaces.
How should I choose the right beads and thread?
Seed beads are best for this stitch. Pick a thread that’s strong and good for beading. This will help your piece last longer.
How do I create the spiral effect in my beadwork?
To get the spiral effect, pay close attention to bead tension and how you turn them. Rotate the beads in a certain way and keep the tension even. This will help you create the helical structure you want.
Is there a preferred colour scheme for the Twisted Tubular Herringbone Stitch?
There’s no one right way to choose colours. Using two colours can make the twist stand out. But, a single colour can look elegant and simple. Try different patterns to see what you like best.
How do I add a clasp to finish my bracelet?
To add a clasp, tie it to the bracelet’s ends with your thread. Make sure it’s tight so the bracelet stays on.
Can I adjust the length of the necklace made with the Twisted Tubular Herringbone Stitch?
Yes, you can make the necklace longer by adding more beads. Measure and adjust as you go to get the perfect length.
What are common mistakes to avoid, and how can I correct them?
Mistakes often include uneven bead tension and wrong needle path. To fix these, keep your tension even and follow the needle path carefully.
Are there any essential skills or techniques I need to master for this stitch?
Yes, you need to know the basic herringbone stitch well. Also, learn to keep your tension and bead orientation consistent. Practising these will help you get better.
Where can I find additional instructional content or beading patterns?
Look for free beading tutorial videos online. You can also join beading communities or buy detailed beading pattern PDFs. These resources can help you learn more and improve your skills.